
First up was the need to make one new claw hammer handle, the hammer part of my dad's tool kit. It had snapped some years ago and I could never find a replacement.
The second my own ball peen hammer its had a few handles after a very rough life. I made the last one not so long ago but the head shrank and it kept dropping off even with a wedge added.
On both I have used Aussie hardwood old floor joist still has some nail holes along the handle of both, filled with CA.
I learnt to make hammer handles at school, they are fun to make as the timber spins off centre creating the oval shape. I'll put a pic up of how to set it up latter.
You have to eyeball how much to take off to form the oval to centre, half of one side, as well as forming the handle shape along the axis.
I do this on two basis,
one traditional and two to suit my hands and needs.
Some people have a large hand, others small and often a badly fitted hammer ends up while in full swing flying through the air. I have found that a slender neck towards the head of ball peen hammers makes it easier to use in tight situations many usually have a bulbous section just below the head this hinders a blow when using it in some metalworking situations. The thinner neck can result though in an easy break.
Enough material has to be left to form the head in ball peen hammers this is still often oval shape I leave about 21/2" - 60mm always measure the head as hammers vary. In Claw hammers its oblong and needs tapering also measure before turning for length and size of head.


I often use the Ball peen hammer in whats known as a choked hold half way up that is why I turned it so it has the bump.
The wider tail of the claw hammer gives better hand purchase and less chance of slipping out of the hand.
My dad's tool box which I have and tools below sadly not all remain and some of those below were added. Photos from Lumberjocks Forum


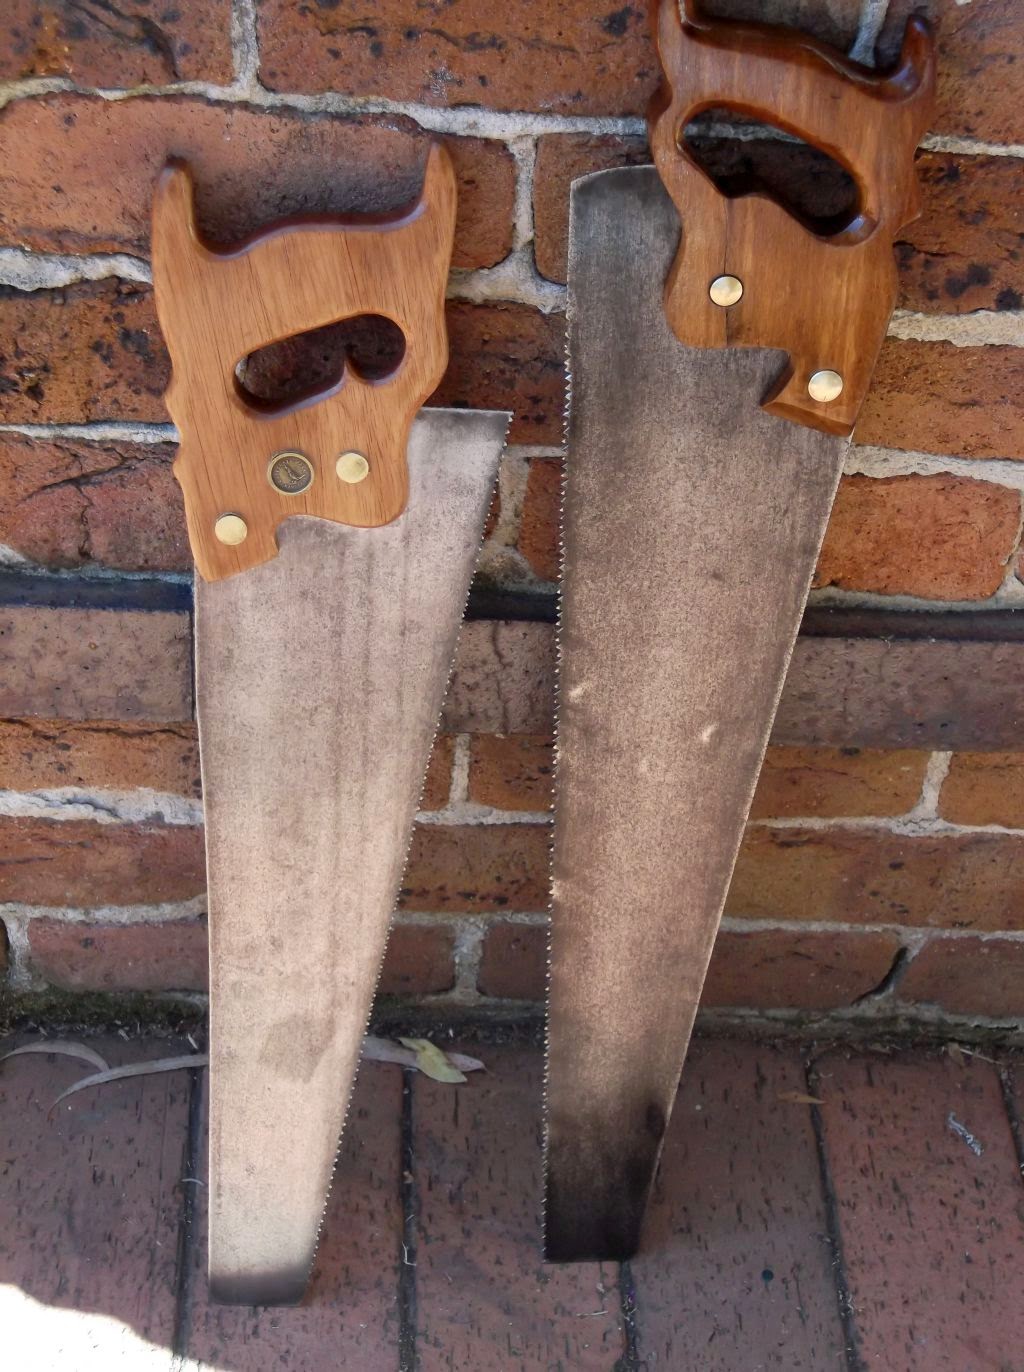
Next a new handle for one of dad's old panel saws, I believe this was a Pax brand. The original handle broke on me way back in the 80's when I borrowed it from dad I had to quickly make a very rough handle. All the tools I had then for woodwork was a jig saw and a fret saw, a rasp, no bench, no vice, no hole saws.
It took me an day to make it.
I had a job to complete while on holidays, dad needed the saw back to finish a job also.
This time I had a bandsaw, hole saws but used spade bits, could have used the scroll saw but used the fret saw like dad's, I had to replace it had gone missing.
The blade also needed a darn good clean up I had done this in the past, all hand cleaned WD40 and sanding the surface rust and grime away.
Once the handle was fitted it got a quick touch up to sharpen it using a triangular diamond file.


Next a ripsaw also dad's needed much attention under the handle the blade had some rusting and the holes for screws were chewed out. I/we cut off the worst allowing the handle to come along the blade by about 3/4" 19mm. Drilled new holes using carbide bits from Aldi's they did the job well, High speed steel bits would even make a mark.
The handle needed sanding back and a I applied 4 coats of brush on Polly Urethane. Sanded the brass screws to remove years of scratches.
Below left the Ripsaw blade and damage. Below right its handle not to bad after 55+ years.


Some clean up marking out to cut the damaged area and new holes drilled.


Handle sanded it had some spalting with in the wood, a small split which I used CA in.
The top view of shape and left first coats of Polly.


Last job was to make and fit a simple mitre bracket to the Bandsaw. Its now quick and easy to locate and put out of the way.
Almost forgot this one.
Thirty plus years ago I made Sue a kitchen knife utility box just out of Radiata Pine. We/she had looked everywhere for what she wanted and couldn't find one anywhere. With her guidance on design it was just a very simple box with a couple of partitions.
It was now to small and looked grungy even tho cleaned often. Sue asked could I make another BUT same basic design as the old one and a little bigger, she had acquired more tools LOL. I can't say no wouldn't dare as the fine fare might come to a halt.
I had some Jarrah and the result she is pleased with.
I added a second row at the back for knives, the very back is for two cleavers.
The side slots also for knives and the steel.


