Last week I got the Oak board out and started planning the edges then the faces. Edges easy as, faces well 3 days of cranky grain 2 knots which I had to use an end/block plane on the area. I was not after a great finish just a workable clean area for marking out as this will be the spinning wheel rim sections known on wagons as Felloe's. My right palm became blistered in using the plane against the cranky grain and knots I couldn't do much for a few days, but it was a good work out physically. Work height was just a tad to high in doing the edges got to remember I can raise and lower this stand.
The Oak has now been cut ready for marking out joints etc and the making of the front edge of the footman as seen here.
The finished mini Swift for Peg Sue found a wooden bead to make the top safer I replaced two arms and 4 rivets put a spacer block at the base for better clearance and spin motion.
Search This Blog
Wednesday, February 22, 2012
Tuesday, February 14, 2012
Back to the Spinning Wheel Restoration
Way back in December 2010 I thought was the last time I did any work on the spinning wheels. In checking I found early 2011 I worked on The Hub.
After a quick clean up today of the bench, I need plenty of room. I am back to restoring the old spinning wheel. I had to align and drill the holes for the footman/treadle steel rod to go through. 8mm mild steel rod, the Oak to house it yet to be cut hopefully tomorrow, I have already cut the two other pieces. After measuring and checking height and clearance I marked and drilled with my new little Ozito 18v battery drill and as you can see close enough to level, I can sand one of the legs base to make it perfect but I won't as it will not matter.


After a quick clean up today of the bench, I need plenty of room. I am back to restoring the old spinning wheel. I had to align and drill the holes for the footman/treadle steel rod to go through. 8mm mild steel rod, the Oak to house it yet to be cut hopefully tomorrow, I have already cut the two other pieces. After measuring and checking height and clearance I marked and drilled with my new little Ozito 18v battery drill and as you can see close enough to level, I can sand one of the legs base to make it perfect but I won't as it will not matter.


Another quick one
A cantilever sewing box saved from Sue's mum's place, has had a tiny bit of work to fix it. All the self tapper screws were dropping out and so I tightened them which made it almost impossible to open. So I sourced some Chicago screws not cheap but very effective as the barrel goes right through both the side of the box and the arm and allows the free movement.
The legs where they were mounted were useless so I removed them as Sue also wants to be able to carry it about and put it on tables without worrying about the legs. A simple scrap pine frame and mounted the legs further out. The weather has warped the frame I am hoping it settles. Sue is going to finish it not sure how yet.

I would have liked to sand the box back and refinish it but with the constant rain we are having no chance maybe later on.
The Chicago screws have many uses, scrap booking, photo albums even attaching wooden handles like on saws.
The legs where they were mounted were useless so I removed them as Sue also wants to be able to carry it about and put it on tables without worrying about the legs. A simple scrap pine frame and mounted the legs further out. The weather has warped the frame I am hoping it settles. Sue is going to finish it not sure how yet.

I would have liked to sand the box back and refinish it but with the constant rain we are having no chance maybe later on.
The Chicago screws have many uses, scrap booking, photo albums even attaching wooden handles like on saws.
 |
| The Chicago Screws |
| Chicago Screws |
Monday, February 13, 2012
4 Years On
Its about 4 years ago I posted this thread in regard to my first ever OT
attempt and the start of my build of a Rose Engine
It got shelved close to being assembled on the MDF bed due to lack of space in my shed at the time and taking on other responsibilities over the last 2 years which were time consuming. Not much has changed although the shed has become more organised sort of and I have stood down from a situation.
Time, space and health still have been my worst enemies although health is better, weather and still time and space are a ARPIA and I can do nothing about the weather or time except stay home and complete tasks.
All my parts bits and pieces still sit in boxes on the shelf. In the last 4 years I have acquired through generous donations by Hughie, Pat two mates called Peter and others more materials, mechanisms etc to make and finish it.
In 4 years I have had the pleasure of using a number of other peoples Rose Engines when at demonstrations at H&F's and Trend and at Sydney Wood show. In being able to use and experience others builds I have learned much as to design.
Researching over 4 years many other Rose Engines through Google, other Ornamental Turning groups and associated Engine Turned OT types, I found each had their owners own style use and design for what ever purpose.
I have started many projects towards the Rose Engine also. I also gained a small 6"grinder from the clean up at Sue's mum's place this will become another machine for cutting patterns.
This year I am endeavouring to get it up and running with what I already have at hand, it has for me to be.
1 Portable
2 Versatile
3 Most of all be able to be dismantled and stored when not in use.
4 Adaptable to my needs for what ever use I have
This will be a long Work In Progress.
 |
| Rose Engine and Rosetts |
It got shelved close to being assembled on the MDF bed due to lack of space in my shed at the time and taking on other responsibilities over the last 2 years which were time consuming. Not much has changed although the shed has become more organised sort of and I have stood down from a situation.
Time, space and health still have been my worst enemies although health is better, weather and still time and space are a ARPIA and I can do nothing about the weather or time except stay home and complete tasks.
All my parts bits and pieces still sit in boxes on the shelf. In the last 4 years I have acquired through generous donations by Hughie, Pat two mates called Peter and others more materials, mechanisms etc to make and finish it.
In 4 years I have had the pleasure of using a number of other peoples Rose Engines when at demonstrations at H&F's and Trend and at Sydney Wood show. In being able to use and experience others builds I have learned much as to design.
Researching over 4 years many other Rose Engines through Google, other Ornamental Turning groups and associated Engine Turned OT types, I found each had their owners own style use and design for what ever purpose.
I have started many projects towards the Rose Engine also. I also gained a small 6"grinder from the clean up at Sue's mum's place this will become another machine for cutting patterns.
This year I am endeavouring to get it up and running with what I already have at hand, it has for me to be.
1 Portable
2 Versatile
3 Most of all be able to be dismantled and stored when not in use.
4 Adaptable to my needs for what ever use I have
This will be a long Work In Progress.
Sunday, February 12, 2012
Pork on the spit
Mark asked could I help out acquiring and making a rotisserie shaft for his BBQ. 8mm square mild steel machined to take a 20mm long x M6 thread on one end and 1500mm long. A good friend Ken (thanks Ken) turned the shaft down for me to thread. Mark did the rest including cooking this beaut Pork for his sons 1st birthday yesterday.
Carded and Blended
A quick update to the previous post on the Alpaca it has now been carded and blended.
A little white Alpaca added.
Monday, February 6, 2012
Wood Movement and not so Swift
The 3 tier stand thats to be made of Rosewood has been cut into rounds and allowed to sit while the weather makes its mind up what its doing. Here you can see how much movement has taken place in the bottom and centre pieces. The centre one being the worst good thing I hadn't jumped in and started turning it.

This small job has been floating around the workshop for near on 12 months often put aside due to more pressing matters
A small Swift in need of repair for one of the Fairfield Spinner and Weaver ladies. A few broken arms which I made 2 new ones a match as best we could in colour, now just to locate some leather type rivets.
16th February Update
Thanks to a good mate Darrell Smith from the OTGA who located and mailed me some Bufrucated rivets I had tried sourcing these and could only find them in boxes of a thousand. I needed 1/2 a dozen.
Sunday, February 5, 2012
Update Odd Job's & Maintenance
For the last week we have had rain almost non stop putting woodwork out of limits. So I took the time to do some much required repairs to the metal bandsaw. Since I purchased it 2nd hand some years ago the V-belt pulley cover has never closed properly and when moving it here damage was done to one of the retaining brackets.
 This caused it to rattle and sound like a load of tin cans being dragged behind a wedding car.
Recently when cuttng the steel block the switch broke this is an auto stop when the cut is finished. The V-belt had begun to smell and had stretched no idea how old it was. The motor mounting plate had surface rust.
Over 4 days I removed the pulleys, switch, motor and cover. Wire brushed the mounting plate, Sue resprayed it for me. Panel beat the pulley cover back into shape removed the old hinges and replaced them and attached a new mounting bracket. Rewired and replaced a the switch, cable and main lead. Motor mounting plate and motor replaced then finally the pulley cover and pulleys and new V-belt. I also took the time to remove the old gear box oil and replaced with new. What a difference I can now hear the blade cutting the steel and have a conversation. I intend to now fit a waste trough for chips a better holding system for securing material needed to be cut.
During this period for two days the weather had taken hold of the body and a touch of flu, in which case Sue had to help me often holding things, popping rivets and put up with my frustrations of slow going.

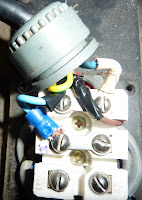
Digital cameras are great for a quick pic of the wiring layout so its not forgotten when the time comes to replace them. Right the motor and mounting plate and new wiring.
Below left the lid now staying closed. New belt and the bracket.
Below the last side of the steel block and first cut after the overhaul its the same thickness all sides of the offcut.
 This caused it to rattle and sound like a load of tin cans being dragged behind a wedding car.
Recently when cuttng the steel block the switch broke this is an auto stop when the cut is finished. The V-belt had begun to smell and had stretched no idea how old it was. The motor mounting plate had surface rust.
Over 4 days I removed the pulleys, switch, motor and cover. Wire brushed the mounting plate, Sue resprayed it for me. Panel beat the pulley cover back into shape removed the old hinges and replaced them and attached a new mounting bracket. Rewired and replaced a the switch, cable and main lead. Motor mounting plate and motor replaced then finally the pulley cover and pulleys and new V-belt. I also took the time to remove the old gear box oil and replaced with new. What a difference I can now hear the blade cutting the steel and have a conversation. I intend to now fit a waste trough for chips a better holding system for securing material needed to be cut.
During this period for two days the weather had taken hold of the body and a touch of flu, in which case Sue had to help me often holding things, popping rivets and put up with my frustrations of slow going.

Digital cameras are great for a quick pic of the wiring layout so its not forgotten when the time comes to replace them. Right the motor and mounting plate and new wiring.
Below left the lid now staying closed. New belt and the bracket.
Subscribe to:
Posts (Atom)


