Search This Blog

Sunday, May 8, 2011

Shades Of Red

There is nothing quite like making something for someone you know so I was delighted to be able to make this scarf for the sister of a friend. I had only the criteria of colour and fibre to go. Since the colour was to be red (who said there aren't a million shades of red) I thought that the recipient have some input . Janice lives in the United States and since Kool Aid is not only readily available there but is also much favoured for dyeing yarn  I asked that she could provide some packets for this process bearing in mind that there are various flavours of red.
I soaked some spun yarn for a short while in a mild detergent solution before adding the concentrated Kool Aid solution. The wool and angora had the cherry flavour added while the alpaca had the wild cheery added. At the same time I over dyed some wool with cochineal to give it more depth of colour since it seemed a little washed out.
Ready for the dye solution
Dark Cherry solution for the alpaca yarn


Fortunately the kitchen sink is stainless steel or there may have been some problems with the Kool Aid staining the sink a bright red. Rubber gloves saved the hands when handling the concentrated Kool Aid packets.


It didn't take long to dye the fibre in the microwave which is dedicated for non food use - either dyeing fibre or drying wood when Ray has a piece which hasn't had enough time to dry out properly before turning it and it fits into this fairly large microwave.

When all the dye has been taken up, the jars are removed and left to cool completely before receiving their final rinse and being left out to dry suspended from the clothes line.


The wool and angora fibre looks as though it has absorbed the dye liquid well but when removed from the glass jar some of the fibre remained white. This gave a slightly mottled effect but probably resulted from having the fibre too crowded in the jar.

A nice breeze meant that drying took very little time.

An old two shaft loom threaded up for weaving
All seven skeins of red yarn used in the scarf
Dyed mohair spun on a bottom whorl drop spindle made by Ray.
The loom is threaded up with random warp threads from the skeins spun. In no particular order they consist of Silk, Mohair, Wool combined with malamute, Wool combined with angora, Alpaca and Camel.The weft yarn is the wool that was over dyed with the cochineal. The loom here is set up without a reed which felt very odd to use as usually the reed is used to beat the work down but in this case the reed was too fine for some of the threads and would have worn them down to almost nothing causing breakages.
 A wide toothed comb was used to beat the weft down. The finished product was fulled in the washing machine for a few minutes then hung out to dry.

Wool of Many Colours III Mobius & Helix Scarf

In the first 2 posts on Wool of Many Colours post one & post two  the process of turning  fibre into yarn and yarn into skeins to create the following Mobius and Helix Scarf for this years Scarf Exchange.

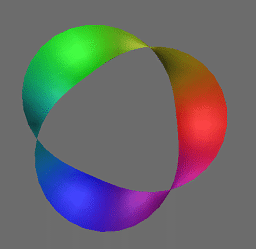
A Moebius is a band which has one face so that if you were to draw a line along its centre, you would end up back where you started without having lifted your pen at all, while a Helix is more like a coil and has two distinct faces.


The scarf uses the now very popular helix design which is also known as a ruffle scarf. The pattern was recently published in the Spin Off magazine. Here I used two balls which I had organised so that the colours would progress and then mirror back on themselves. This isn't an exact duplications as with any hand dyeing, there are slight variations in the bands of colour but I came as close as I could. The moebius was worked in a similar manner with the colours progressing through out though I was a little more difficult as there is a distinct lace pattern in this moebius which isn't normally used. A plain garter stitch is more common but I like a challenge. Here I have to credit Brigit Freyer from www.die-wolllust.de for her pattern "Wave of color". When I came to knitting this moebius, the number of stitches called for was insufficient for the size of garment I had intended to make so another two pattern repeats were added. This meant that I ran out of yarn before finishing the lace edging. Fortunately there was enough fibre left that I could spin up enough to finish. I hope that whoever receives it like what I have done with the fibre.
"Wave of Color" moebius. I like the way the colours graduate and end with the orange and yellow. It makes me think of flames licking around the edges of the moebius.
Helix scarf.

Saturday, April 23, 2011

Rough Cut

I first went timber shopping with my dad about 1963 to a sawmill somewhere around Hurstville/Kinsgrove where we were living at the time. I loved the scents of fresh cut wood the various colours available, texture and grains.

I don't think my love for real wood has changed in all those years. Mal from Boutique Timbers has some amazing timbers to choose from his latest cut is some beautiful Dark Jarrah I hope to see some of this at the June 17th to 19th Sydney Working with Wood Show

The Ornamental Turners Group will also be there as usual demonstrating their craft.

Tuesday, April 5, 2011

Cole Jaw Extention

Cole Jaw Extension set 
I recently made a set of extension's for my Cole Jaw  of which i have two sets one made of Aluminium at Ornamental Turners and a steel set from Gary Pye . I made the extension set out of 16mm MDF to take the diameter to 500mm. I made a template out of 10mm MDF first. marking the main mounting holes. These were drilled with a small drill bit, then truing up the outer edge on the lathe.


Rear View of Cole Jaws
Normal Cole Jaws in use


 Cole Jaws are an add on set of jaws to a chuck to hold larger bowls or odd shapes usually for finishing the base. They are not so damaging to the work itself as buttons are used to hold the job securely.  Speeds of the lathe should be kept to no more than about 600 rpm with diameter's of this size 500mm+. I didn't get a photo of the jaws cut into quarters as I plain forgot to take it, or with the button holes drilled.  Although these were marked out and centre punched, I past the first set onto Pat a mate and as he needs to true them to his Cole jaws before drilling the radius mounting holes.

Monday, March 28, 2011

Wool of Many Colours II

1st Bobbin


Progress from my first post on my Scarf Exchange fibre the fibre was divided into two distinct colour ways. Firstly the deeper reds, orange and yellow has been spun and plied. Today it was washed and hung out to dry. The rest, what I consider gelato colours because of their cooler and softer pastel tones were split down their length then split down their length a second time, rolled loosely into balls ready for spinning. Fortunately the dyes used permeated the fibre fairly well so there was quite a uniform progression of colours. When it came to plying the singles the colours matched up fairly well with only small areas where there was a gradual blending of colours from one to another . It was a very interesting exercise watching how the colours graded through from the primary shades into the secondary and tertiary colours. I learned a great deal about colour blending in the process which I thought was a good way of approaching a project where I wanted colour definition but didn't want to use the usual Navaho plying technique. I decided that a three ply would be too bulky for what I had planned to knit from it.


1st Hanks spun

Sunday, March 20, 2011

Woven Scarves

I have been using my 2 shaft loom which was past on to me from Joan Fisher founder of Fairfield Spinners. Its a handy little loom, which sits on top of my treadle Singer sewing machine a nice working height.


Monday, March 14, 2011

Scarf Exchange Wool Of Many Colours

I received my fibre from the Scarf-exchange today. I thought I would show it off prior to spinning and making what ever it is I'll make with it. My friend commented that the colours were really "yummy". I think I'd have to agree.

Wednesday, March 9, 2011

An Great Find

In this post my ramblings brought up my passion for Vintage and Veteran vehicles and a time I recall well working weekends at Greens Motorcade Museum. Mr George Green one of the owners a true gentleman with a zest for life and love for his collection, its was a shame to see it sold off. Sydney lost a great family venue a historical museum its location now just a memory along Camden Valley Way a housing estate.

While setting up to take the photo's of the pens using a book on Drawing out fell this leaflet from those days in the mid 70's.
The old Traction Engine which stood at the entrance     


Right In the background old Beecroft Fire Station, Beside The Oaks Tea Room and in front a 1927 Dennis Fire Engine used for rides. Crash gear box with a cone clutch, manual brakes no hydraulics.


Right  The 1912 English Star a dream to drive a pleasure I had often, crank start and it had an Engine compression whistle. Whic I would take pleasure in using when seeing the Golfers next door teeing off.


Left In doors one of the exhibits was this old Charabanc.


Right  Yet another Fire Engine.


I make no apologies for quality of the photo's as they were taken on a Kodak 126.

Tuesday, March 8, 2011

To Pass on a message we Write and Sketch

New Guinea Rosewood Sierra pen & Mini Sketch Pencil
English Oak Sierra & Workshop Pencil


Queensland Wallnut Slimeline
As long as man or woman wishes to pass on messages be it drawing, sketches, knowledge, scriptures or sign there life away their will always be a need for writing implements.

I decided to create a matched pair of a Sierra pen and Sketch Pencil sets using different timbers, using
English Oak off cuts from the spinning wheel I am making.
Tassie Myrtle Burl off cuts from Pat a good friend.
Queensland Wallnut also from Pat
Native Olive and off cut from a large piece from Nick.
New Guinea Rosewood from scarp from Rob.

A series of Slimelines from acrylic which young Dave passed onto me as he found the fumes to toxic.
A Queensland Wallnut Slimeline and New Guinea Rosewood Pen and Pencil.

The kits for the Sierra Pen, Mini Sketch Pencil and Workshop Pencil all were supplied by 043turning, with Ian delving into his own stock to accommodate my order for the Workshop Pencils. I prefer to make the Workshop pencil with out the centre band so that it can be easily removed, with the centre band withdrawing the main mechanism is not possible when the sharpener is glued into place. Although a hex-nut is used to stop the pencil rolling off benches etc a need for a clip is there also.

The Mini Sketch pencils come with a 3mm lead while the Workshop pencils are 5mm leads.

New Guinea Rosewood Slimeline Pen & Pencil

The Slimeline kits supplied by David from Timberbits  all but the Slimeline Pencil that came from Jim Carroll of Carroll's Woodcraft Supplies 

Acrylic Slimelines


QLD Wallnut disaster


 Making pens is not without its problems as seen here in making one of the Workshop pencils. An easy repair this time.


Queensland Wallnut & the pencil that exploded
Tassie Myrtle Burl


Native Olive
Native Olive
Same pen different view.


Latest Pen Turning

Sunday, February 27, 2011

The Hub

The simple set up
Checking alignment


Testing spacing and orientation

12 holes equi-spaced
I had chance to set up a drilling rig so I could drill and position the spoke holes using the indexing on the lathe. The drill stand is one I picked up from Aldi's it has a good solid cast steel base, the post is just tube and only light. The mounting for the drill is sturdy, the operation of the drilling mechanism is a bit sloppy but easy to align and drills straight. I used a Centre bit for easy alignment and a pre-drill, the holes where then bored out to 3/8. A Brad bit would have done the job in one go but the height set up would not have allowed for one. 

Brodie's Socks


The arrival of our new grandson Brodie had Sue making two pairs of socks.

Thursday, February 17, 2011